MCP 클라이언트 만들기 - Python
이 튜토리얼에서는 MCP 서버에 연결하는 LLM 기반 챗봇 클라이언트를 Python으로 구현합니다. 첫 서버를 만드는 기본 흐름은 빠른 시작 튜토리얼에서 먼저 익히면 도움이 됩니다.
시스템 요구사항
시작하기 전에 아래 요구사항을 만족하는지 확인하세요:
- Mac 또는 Windows 컴퓨터
- 최신 Python 설치
- 최신
uv설치
환경 설정
먼저 uv로 새 Python 프로젝트를 만듭니다:
# Create project directory
uv init mcp-client
cd mcp-client

# Create virtual environment
uv venv

# Activate virtual environment
# On Windows:
.venv\Scripts\activate
# On Unix or MacOS:
source .venv/bin/activate

# Install required packages
uv add mcp anthropic python-dotenv

# Remove boilerplate files
rm hello.py

# Create our main file
touch client.py
API 키 설정
Anthropic Console에서 Anthropic API 키가 필요합니다.
키를 저장할 .env 파일을 만듭니다:
# Create .env file
touch .env.env에 키를 추가합니다:
ANTHROPIC_API_KEY=<your key here>.gitignore에 .env를 추가합니다:
echo ".env" >> .gitignoreANTHROPIC_API_KEY는 반드시 안전하게 보관하세요.클라이언트 만들기
기본 클라이언트 구조
먼저 import를 준비하고 기본 클라이언트 클래스를 만듭니다:
import asyncio
from typing import Optional
from contextlib import AsyncExitStack

from mcp import ClientSession, StdioServerParameters
from mcp.client.stdio import stdio_client

from anthropic import Anthropic
from dotenv import load_dotenv

load_dotenv()  # load environment variables from .env

class MCPClient:
    def __init__(self):
        # Initialize session and client objects
        self.session: Optional[ClientSession] = None
        self.exit_stack = AsyncExitStack()
        self.anthropic = Anthropic()
    # methods will go here
서버 연결 관리
다음으로 MCP 서버에 연결하는 메서드를 구현합니다:
async def connect_to_server(self, server_script_path: str):
    """Connect to an MCP server

    Args:
        server_script_path: Path to the server script (.py or .js)
    """
    is_python = server_script_path.endswith('.py')
    is_js = server_script_path.endswith('.js')
    if not (is_python or is_js):
        raise ValueError("Server script must be a .py or .js file")

    command = "python" if is_python else "node"
    server_params = StdioServerParameters(
        command=command,
        args=[server_script_path],
        env=None
    )

    stdio_transport = await self.exit_stack.enter_async_context(stdio_client(server_params))
    self.stdio, self.write = stdio_transport
    self.session = await self.exit_stack.enter_async_context(ClientSession(self.stdio, self.write))

    await self.session.initialize()

    # List available tools
    response = await self.session.list_tools()
    tools = response.tools
    print("\nConnected to server with tools:", [tool.name for tool in tools])
질의 처리 로직
이제 질의를 처리하고 도구 호출(tool call)을 다루는 핵심 기능을 추가합니다:
async def process_query(self, query: str) -> str:
    """Process a query using Claude and available tools"""
    messages = [
        {
            "role": "user",
            "content": query
        }
    ]

    response = await self.session.list_tools()
    available_tools = [{
        "name": tool.name,
        "description": tool.description,
        "input_schema": tool.inputSchema
    } for tool in response.tools]

    # Initial Claude API call
    response = self.anthropic.messages.create(
        model="claude-3-5-sonnet-20241022",
        max_tokens=1000,
        messages=messages,
        tools=available_tools
    )

    # Process response and handle tool calls
    tool_results = []
    final_text = []

    for content in response.content:
        if content.type == 'text':
            final_text.append(content.text)
        elif content.type == 'tool_use':
            tool_name = content.name
            tool_args = content.input

            # Execute tool call
            result = await self.session.call_tool(tool_name, tool_args)
            tool_results.append({"call": tool_name, "result": result})
            final_text.append(f"[Calling tool {tool_name} with args {tool_args}]")

            # Continue conversation with tool results
            if hasattr(content, 'text') and content.text:
                messages.append({
                  "role": "assistant",
                  "content": content.text
                })
            messages.append({
                "role": "user",
                "content": result.content
            })

            # Get next response from Claude
            response = self.anthropic.messages.create(
                model="claude-3-5-sonnet-20241022",
                max_tokens=1000,
                messages=messages,
            )

            final_text.append(response.content[0].text)

    return "\n".join(final_text)
대화형 채팅 인터페이스
이제 채팅 루프와 리소스 정리(cleanup) 기능을 추가합니다:
async def chat_loop(self):
    """Run an interactive chat loop"""
    print("\nMCP Client Started!")
    print("Type your queries or 'quit' to exit.")

    while True:
        try:
            query = input("\nQuery: ").strip()

            if query.lower() == 'quit':
                break

            response = await self.process_query(query)
            print("\n" + response)

        except Exception as e:
            print(f"\nError: {str(e)}")

async def cleanup(self):
    """Clean up resources"""
    await self.exit_stack.aclose()
메인 엔트리 포인트
마지막으로 메인 실행 로직을 추가합니다:
async def main():
    if len(sys.argv) < 2:
        print("Usage: python client.py <path_to_server_script>")
        sys.exit(1)

    client = MCPClient()
    try:
        await client.connect_to_server(sys.argv[1])
        await client.chat_loop()
    finally:
        await client.cleanup()

if __name__ == "__main__":
    import sys
    asyncio.run(main())
전체 client.py 파일은 여기에서 확인할 수 있습니다.
핵심 구성 요소 설명
1. 클라이언트 초기화
MCPClient클래스에서 세션 관리와 API 클라이언트를 초기화합니다.AsyncExitStack으로 리소스를 안전하게 관리합니다.- Claude 상호작용을 위해 Anthropic 클라이언트를 구성합니다.
2. 서버 연결
- Python/Node.js 서버를 모두 지원합니다.
- 서버 스크립트 타입을 검증합니다.
- 통신 채널을 올바르게 설정합니다.
- 세션을 초기화하고 사용 가능한 도구를 나열합니다.
3. 질의 처리
- 대화 컨텍스트를 유지합니다.
- Claude의 응답과 도구 호출을 처리합니다.
- Claude ↔ 도구 간 메시지 흐름을 관리합니다.
- 결과를 자연스러운 응답으로 결합합니다.
4. 대화형 인터페이스
- 간단한 CLI를 제공합니다.
- 사용자 입력을 받고 응답을 출력합니다.
- 기본 오류 처리를 포함합니다.
- 정상 종료(graceful exit)를 지원합니다.
5. 리소스 관리
- 리소스를 올바르게 정리합니다.
- 연결 문제에 대한 오류 처리를 포함합니다.
- 정상 종료 절차를 제공합니다.
자주 커스터마이징하는 지점
도구 처리
- 특정 도구 유형에 맞게
process_query()를 수정 - 도구 호출에 대한 커스텀 오류 처리 추가
- 도구별 응답 포맷팅 구현
- 특정 도구 유형에 맞게
응답 처리
- 도구 결과를 어떻게 포맷팅할지 커스터마이징
- 응답 필터링/변환 추가
- 커스텀 로깅 구현
사용자 인터페이스
- GUI 또는 웹 인터페이스 추가
- 콘솔 출력 고도화
- 커맨드 히스토리/자동완성 추가
클라이언트 실행
임의의 MCP 서버와 함께 클라이언트를 실행하려면:
uv run client.py path/to/server.py # python server
uv run client.py path/to/build/index.js # node server
빠른 시작에서 weather 튜토리얼을 이어서 진행한다면, 명령은 예를 들어 다음처럼 보일 수 있습니다:
python client.py .../weather/src/weather/server.py클라이언트는 다음을 수행합니다:
- 지정한 서버에 연결
- 사용 가능한 도구 목록 출력
- 대화형 채팅 세션 시작(가능한 작업):
- 질의 입력
- 도구 실행 확인
- Claude 응답 확인
빠른 시작의 weather 서버에 연결되었을 때의 예시 화면:
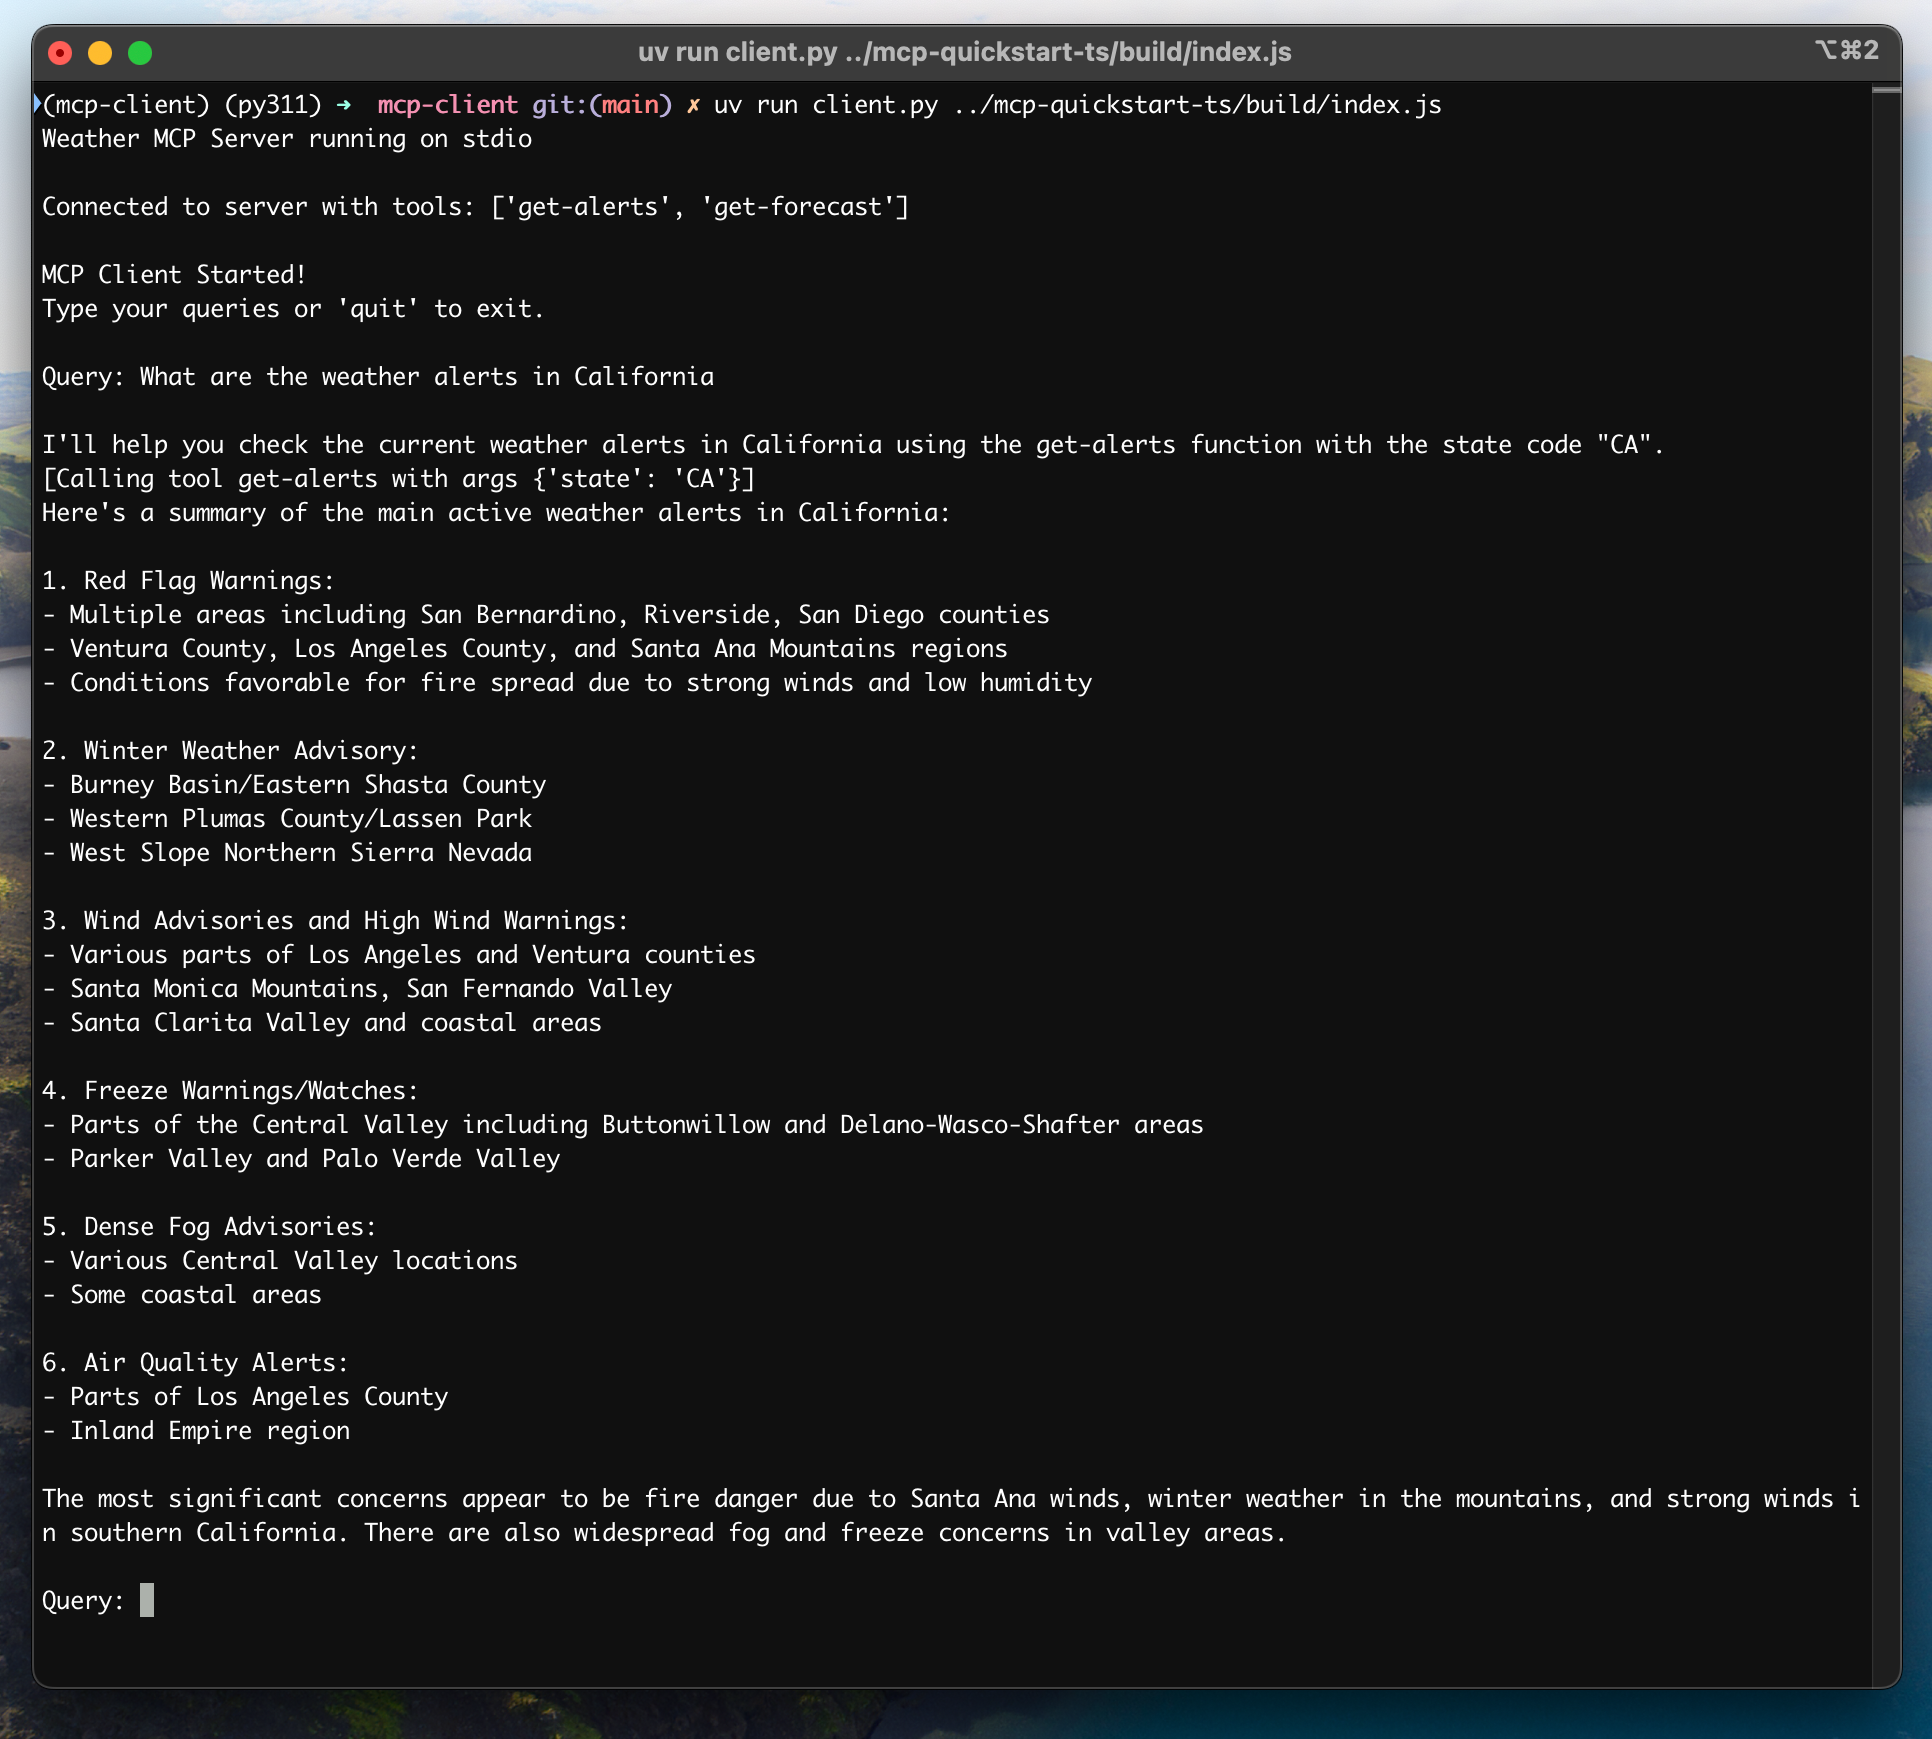
동작 방식
질의를 입력하면:
- 클라이언트가 서버에서 사용 가능한 도구 목록을 가져옵니다.
- 도구 설명과 함께 질의를 Claude로 전송합니다.
- Claude가 사용할 도구(있다면)를 결정합니다.
- 클라이언트가 서버를 통해 요청된 도구 호출을 실행합니다.
- 결과를 Claude에 다시 전달합니다.
- Claude가 자연어 응답을 생성합니다.
- 응답이 화면에 출력됩니다.
모범 사례
오류 처리
- 도구 호출은 항상 try-catch로 감싸기
- 의미 있는 오류 메시지 제공
- 연결 문제를 정상적으로 처리
리소스 관리
AsyncExitStack으로 안전한 정리(cleanup)- 작업이 끝나면 연결 종료
- 서버 연결 해제(disconnection) 처리
보안
- API 키는
.env에 안전하게 저장 - 서버 응답 검증
- 도구 권한 설정에 주의
- API 키는
트러블슈팅
서버 경로 문제
- 서버 스크립트 경로가 정확한지 다시 확인하세요.
- 상대 경로가 동작하지 않으면 절대 경로를 사용하세요.
- Windows에서는 경로에 슬래시(/) 또는 이스케이프된 백슬래시(\)를 사용하세요.
- 서버 파일 확장자가 올바른지 확인하세요(Python은 .py, Node.js는 .js).
올바른 경로 사용 예시:
# Relative path
uv run client.py ./server/weather.py

# Absolute path
uv run client.py /Users/username/projects/mcp-server/weather.py

# Windows path (either format works)
uv run client.py C:/projects/mcp-server/weather.py
uv run client.py C:\\projects\\mcp-server\\weather.py
응답 지연
- 첫 응답은 최대 30초 정도 걸릴 수 있습니다.
- 이는 정상이며 보통 아래 작업 동안 발생합니다:
- 서버 초기화
- Claude가 질의 처리
- 도구 실행
- 이후 응답은 일반적으로 더 빠릅니다.
- 초기 대기 중에는 프로세스를 중단하지 마세요.
자주 보이는 오류 메시지
다음 오류가 보이면:
FileNotFoundError: 서버 경로를 확인하세요.Connection refused: 서버가 실행 중인지, 경로가 올바른지 확인하세요.Tool execution failed: 도구에 필요한 환경 변수가 설정되어 있는지 확인하세요.Timeout error: 클라이언트 설정에서 타임아웃을 늘리는 것을 고려하세요.