서버 개발자를 위한 가이드
이 튜토리얼에서는 간단한 MCP 날씨 서버를 구축하고 이를 호스트인 Claude for Desktop에 연결합니다. 기본 설정부터 시작하여 더 복잡한 사용 사례로 진행할 것입니다.
구축할 내용
많은 LLM(Claude 포함)은 현재 예보 및 심각한 날씨 경보를 가져오는 기능이 없습니다. MCP를 사용하여 이 문제를 해결해 봅시다!
get-alerts와 get-forecast라는 두 개의 도구를 제공하는 서버를 구축할 것입니다. 그런 다음 이 서버를 MCP 호스트(이 경우 Claude for Desktop)에 연결합니다:
Claude.ai가 아닌 Claude for Desktop을 사용하는 이유는 무엇인가요?
MCP 핵심 개념
MCP 서버는 세 가지 주요 유형의 기능을 제공할 수 있습니다:
- 리소스: 클라이언트가 읽을 수 있는 파일과 유사한 데이터(API 응답 또는 파일 내용 등)
- 도구: LLM이 호출할 수 있는 함수(사용자 승인 필요)
- 프롬프트: 사용자가 특정 작업을 완료하는 데 도움이 되는 미리 작성된 템플릿
이 튜토리얼은 주로 도구에 중점을 둡니다.
날씨 서버 구축을 시작해 봅시다! 여기서 구축할 내용의 전체 코드를 찾을 수 있습니다.
사전 지식
이 빠른 시작은 다음에 익숙하다고 가정합니다:
- Python
- Claude와 같은 LLM
시스템 요구사항
- Python 3.10 이상이 설치되어 있어야 합니다.
- Python MCP SDK 1.2.0 이상을 사용해야 합니다.
환경 설정
먼저 uv를 설치하고 Python 프로젝트와 환경을 설정해 보겠습니다:
uv 설치
curl -LsSf https://astral.sh/uv/install.sh | shpowershell -ExecutionPolicy ByPass -c "irm https://astral.sh/uv/install.ps1 | iex"uv 명령어가 인식되도록 이후에 터미널을 다시 시작해야 합니다.
이제 프로젝트를 생성하고 설정해 보겠습니다:
프로젝트 생성
# 프로젝트용 새 디렉토리 생성
uv init weather
cd weather

# 가상 환경 생성 및 활성화
uv venv
source .venv/bin/activate

# 의존성 설치
uv add "mcp[cli]" httpx

# 서버 파일 생성
touch weather.py
# 프로젝트용 새 디렉토리 생성
uv init weather
cd weather
# 가상 환경 생성 및 활성화
uv venv
.venv\Scripts\activate
# 의존성 설치
uv add mcp[cli] httpx
# 서버 파일 생성
new-item weather.py이제 서버 구축을 시작해 보겠습니다.
서버 구축
패키지 가져오기 및 인스턴스 설정
weather.py 파일 상단에 다음을 추가하세요:
from typing import Any
import httpx
from mcp.server.fastmcp import FastMCP

# FastMCP 서버 초기화
mcp = FastMCP("weather")

# 상수
NWS_API_BASE = "https://api.weather.gov"
USER_AGENT = "weather-app/1.0"
FastMCP 클래스는 Python 타입 힌트와 독스트링을 사용하여 도구 정의를 자동으로 생성하므로 MCP 도구를 쉽게 생성하고 유지할 수 있습니다.
헬퍼 함수
다음으로, National Weather Service API에서 데이터를 조회하고 형식화하는 헬퍼 함수를 추가해 보겠습니다:
async def make_nws_request(url: str) -> dict[str, Any] | None:
    """적절한 오류 처리로 NWS API에 요청합니다."""
    headers = {
        "User-Agent": USER_AGENT,
        "Accept": "application/geo+json"
    }
    async with httpx.AsyncClient() as client:
        try:
            response = await client.get(url, headers=headers, timeout=30.0)
            response.raise_for_status()
            return response.json()
        except Exception:
            return None

def format_alert(feature: dict) -> str:
    """경보 기능을 읽기 쉬운 문자열로 형식화합니다."""
    props = feature["properties"]
    return f"""
Event: {props.get('event', 'Unknown')}
Area: {props.get('areaDesc', 'Unknown')}
Severity: {props.get('severity', 'Unknown')}
Description: {props.get('description', 'No description available')}
Instructions: {props.get('instruction', 'No specific instructions provided')}
"""
도구 실행 구현
도구 실행 핸들러는 각 도구의 논리를 실제로 실행하는 역할을 합니다. 추가해 보겠습니다:
@mcp.tool()
async def get_alerts(state: str) -> str:
    """미국 주의 날씨 경보를 가져옵니다.

    Args:
        state: 두 글자 미국 주 코드(예: CA, NY)
    """
    url = f"{NWS_API_BASE}/alerts/active/area/{state}"
    data = await make_nws_request(url)

    if not data or "features" not in data:
        return "경보를 가져올 수 없거나 경보를 찾을 수 없습니다."

    if not data["features"]:
        return "이 주에 활성 경보가 없습니다."

    alerts = [format_alert(feature) for feature in data["features"]]
    return "\n---\n".join(alerts)

@mcp.tool()
async def get_forecast(latitude: float, longitude: float) -> str:
    """위치의 날씨 예보를 가져옵니다.

    Args:
        latitude: 위치의 위도
        longitude: 위치의 경도
    """
    # 먼저 예보 그리드 엔드포인트 가져오기
    points_url = f"{NWS_API_BASE}/points/{latitude},{longitude}"
    points_data = await make_nws_request(points_url)

    if not points_data:
        return "이 위치의 예보 데이터를 가져올 수 없습니다."

    # 포인트 응답에서 예보 URL 가져오기
    forecast_url = points_data["properties"]["forecast"]
    forecast_data = await make_nws_request(forecast_url)

    if not forecast_data:
        return "상세 예보를 가져올 수 없습니다."

    # 기간을 읽기 쉬운 예보로 형식화
    periods = forecast_data["properties"]["periods"]
    forecasts = []
    for period in periods[:5]:  # 다음 5개 기간만 표시
        forecast = f"""
{period['name']}:
Temperature: {period['temperature']}°{period['temperatureUnit']}
Wind: {period['windSpeed']} {period['windDirection']}
Forecast: {period['detailedForecast']}
"""
        forecasts.append(forecast)

    return "\n---\n".join(forecasts)
서버 실행
마지막으로, 서버를 초기화하고 실행해 보겠습니다:
if __name__ == "__main__":
    # 서버 초기화 및 실행
    mcp.run(transport='stdio')
서버가 완성되었습니다! uv run weather.py를 실행하여 모든 것이 올바르게 작동하는지 확인하세요.
이제 기존 MCP 호스트인 Claude for Desktop에서 서버를 테스트해 보겠습니다.
Claude for Desktop으로 서버 테스트
먼저, Claude for Desktop이 설치되어 있는지 확인하세요. 여기서 최신 버전을 설치할 수 있습니다. Claude for Desktop이 이미 있는 경우, 최신 버전으로 업데이트되었는지 확인하세요.
사용하려는 MCP 서버에 대해 Claude for Desktop을 구성해야 합니다. 이렇게 하려면 텍스트 편집기에서 ~/Library/Application Support/Claude/claude_desktop_config.json에 있는 Claude for Desktop 앱 구성을 여세요. 파일이 없는 경우 생성해야 합니다.
예를 들어, VS Code가 설치된 경우:
구성 파일 열기
code ~/Library/Application\ Support/Claude/claude_desktop_config.jsoncode $env:AppData\Claude\claude_desktop_config.json그런 다음 mcpServers 키에 서버를 추가합니다. MCP UI 요소는 최소한 하나의 서버가 올바르게 구성된 경우에만 Claude for Desktop에 표시됩니다.
이 경우, 다음과 같이 단일 날씨 서버를 추가합니다:
Claude for Desktop 구성
{
    "mcpServers": {
        "weather": {
            "command": "uv",
            "args": [
                "--directory",
                "/ABSOLUTE/PATH/TO/PARENT/FOLDER/weather",
                "run",
                "weather.py"
            ]
        }
    }
}
{
"mcpServers": {
"weather": {
"command": "uv",
"args": [
"--directory",
"C:\\ABSOLUTE\\PATH\\TO\\PARENT\\FOLDER\\weather",
"run",
"weather.py"
]
}
}
}command 필드에 uv 실행 파일의 전체 경로를 넣어야 할 수 있습니다. MacOS/Linux에서 which uv를 실행하거나 Windows에서 where uv를 실행하여 이 경로를 얻을 수 있습니다.이것은 Claude for Desktop에 다음을 알려줍니다:
- “weather"라는 MCP 서버가 있다
uv --directory /ABSOLUTE/PATH/TO/PARENT/FOLDER/weather run weather를 실행하여 시작한다
파일을 저장하고 Claude for Desktop을 다시 시작하세요.
날씨 서버 구축을 시작해 봅시다! 여기서 구축할 내용의 전체 코드를 찾을 수 있습니다.
사전 지식
이 빠른 시작은 다음에 익숙하다고 가정합니다:
- TypeScript
- Claude와 같은 LLM
시스템 요구사항
TypeScript의 경우, 최신 버전의 Node가 설치되어 있는지 확인하세요.
환경 설정
먼저, Node.js와 npm을 설치하지 않았다면 설치하세요. nodejs.org에서 다운로드할 수 있습니다. Node.js 설치를 확인하세요:
node --version
npm --version
이 튜토리얼에서는 Node.js 버전 16 이상이 필요합니다.
이제 프로젝트를 생성하고 설정해 보겠습니다:
프로젝트 생성
# 프로젝트용 새 디렉토리 생성
mkdir weather
cd weather

# 새 npm 프로젝트 초기화
npm init -y

# 의존성 설치
npm install @modelcontextprotocol/sdk zod
npm install -D @types/node typescript

# 파일 생성
mkdir src
touch src/index.ts
# 프로젝트용 새 디렉토리 생성
md weather
cd weather
# 새 npm 프로젝트 초기화
npm init -y
# 의존성 설치
npm install @modelcontextprotocol/sdk zod
npm install -D @types/node typescript
# 파일 생성
md src
new-item src\index.ts빌드 스크립트와 type: “module"을 추가하도록 package.json을 업데이트하세요:
{
  "type": "module",
  "bin": {
    "weather": "./build/index.js"
  },
  "scripts": {
    "build": "tsc && node -e \"require('fs').chmodSync('build/index.js', '755')\"",
  },
  "files": [
    "build"
  ],
}
프로젝트 루트에 tsconfig.json을 생성하세요:
{
  "compilerOptions": {
    "target": "ES2022",
    "module": "Node16",
    "moduleResolution": "Node16",
    "outDir": "./build",
    "rootDir": "./src",
    "strict": true,
    "esModuleInterop": true,
    "skipLibCheck": true,
    "forceConsistentCasingInFileNames": true
  },
  "include": ["src/**/*"],
  "exclude": ["node_modules"]
}
이제 서버 구축을 시작해 보겠습니다.
서버 구축
패키지 가져오기 및 인스턴스 설정
src/index.ts 상단에 다음을 추가하세요:
import { McpServer } from "@modelcontextprotocol/sdk/server/mcp.js";
import { StdioServerTransport } from "@modelcontextprotocol/sdk/server/stdio.js";
import { z } from "zod";

const NWS_API_BASE = "https://api.weather.gov";
const USER_AGENT = "weather-app/1.0";

// 서버 인스턴스 생성
const server = new McpServer({
  name: "weather",
  version: "1.0.0",
});
헬퍼 함수
다음으로, National Weather Service API에서 데이터를 조회하고 형식화하는 헬퍼 함수를 추가해 보겠습니다:
// NWS API 요청을 위한 헬퍼 함수
async function makeNWSRequest<T>(url: string): Promise<T | null> {
  const headers = {
    "User-Agent": USER_AGENT,
    Accept: "application/geo+json",
  };

  try {
    const response = await fetch(url, { headers });
    if (!response.ok) {
      throw new Error(`HTTP error! status: ${response.status}`);
    }
    return (await response.json()) as T;
  } catch (error) {
    console.error("NWS 요청 중 오류 발생:", error);
    return null;
  }
}

interface AlertFeature {
  properties: {
    event?: string;
    areaDesc?: string;
    severity?: string;
    status?: string;
    headline?: string;
  };
}

// 경보 데이터 형식화
function formatAlert(feature: AlertFeature): string {
  const props = feature.properties;
  return [
    `Event: ${props.event || "Unknown"}`,
    `Area: ${props.areaDesc || "Unknown"}`,
    `Severity: ${props.severity || "Unknown"}`,
    `Status: ${props.status || "Unknown"}`,
    `Headline: ${props.headline || "No headline"}`,
    "---",
  ].join("\n");
}

interface ForecastPeriod {
  name?: string;
  temperature?: number;
  temperatureUnit?: string;
  windSpeed?: string;
  windDirection?: string;
  shortForecast?: string;
}

interface AlertsResponse {
  features: AlertFeature[];
}

interface PointsResponse {
  properties: {
    forecast?: string;
  };
}

interface ForecastResponse {
  properties: {
    periods: ForecastPeriod[];
  };
}
도구 실행 구현
도구 실행 핸들러는 각 도구의 논리를 실제로 실행하는 역할을 합니다. 추가해 보겠습니다:
// 날씨 도구 등록
server.tool(
  "get-alerts",
  "주의 날씨 경보를 가져옵니다",
  {
    state: z.string().length(2).describe("두 글자 주 코드(예: CA, NY)"),
  },
  async ({ state }) => {
    const stateCode = state.toUpperCase();
    const alertsUrl = `${NWS_API_BASE}/alerts?area=${stateCode}`;
    const alertsData = await makeNWSRequest<AlertsResponse>(alertsUrl);

    if (!alertsData) {
      return {
        content: [
          {
            type: "text",
            text: "경보 데이터 검색 실패",
          },
        ],
      };
    }

    const features = alertsData.features || [];
    if (features.length === 0) {
      return {
        content: [
          {
            type: "text",
            text: `${stateCode}에 대한 활성 경보 없음`,
          },
        ],
      };
    }

    const formattedAlerts = features.map(formatAlert);
    const alertsText = `${stateCode}에 대한 활성 경보:\n\n${formattedAlerts.join("\n")}`;

    return {
      content: [
        {
          type: "text",
          text: alertsText,
        },
      ],
    };
  },
);

server.tool(
  "get-forecast",
  "위치의 날씨 예보를 가져옵니다",
  {
    latitude: z.number().min(-90).max(90).describe("위치의 위도"),
    longitude: z.number().min(-180).max(180).describe("위치의 경도"),
  },
  async ({ latitude, longitude }) => {
    // 그리드 포인트 데이터 가져오기
    const pointsUrl = `${NWS_API_BASE}/points/${latitude.toFixed(4)},${longitude.toFixed(4)}`;
    const pointsData = await makeNWSRequest<PointsResponse>(pointsUrl);

    if (!pointsData) {
      return {
        content: [
          {
            type: "text",
            text: `좌표 ${latitude}, ${longitude}에 대한 그리드 포인트 데이터 검색 실패. 이 위치는 NWS API에서 지원되지 않을 수 있습니다(미국 위치만 지원됨).`,
          },
        ],
      };
    }

    const forecastUrl = pointsData.properties?.forecast;
    if (!forecastUrl) {
      return {
        content: [
          {
            type: "text",
            text: "그리드 포인트 데이터에서 예보 URL 가져오기 실패",
          },
        ],
      };
    }

    // 예보 데이터 가져오기
    const forecastData = await makeNWSRequest<ForecastResponse>(forecastUrl);
    if (!forecastData) {
      return {
        content: [
          {
            type: "text",
            text: "예보 데이터 검색 실패",
          },
        ],
      };
    }

    const periods = forecastData.properties?.periods || [];
    if (periods.length === 0) {
      return {
        content: [
          {
            type: "text",
            text: "예보 기간을 사용할 수 없음",
          },
        ],
      };
    }

    // 예보 기간 형식화
    const formattedForecast = periods.map((period: ForecastPeriod) =>
      [
        `${period.name || "Unknown"}:`,
        `Temperature: ${period.temperature || "Unknown"}°${period.temperatureUnit || "F"}`,
        `Wind: ${period.windSpeed || "Unknown"} ${period.windDirection || ""}`,
        `${period.shortForecast || "No forecast available"}`,
        "---",
      ].join("\n"),
    );

    const forecastText = `${latitude}, ${longitude}에 대한 예보:\n\n${formattedForecast.join("\n")}`;

    return {
      content: [
        {
          type: "text",
          text: forecastText,
        },
      ],
    };
  },
);
서버 실행
마지막으로, 서버를 실행하기 위한 메인 함수를 구현하세요:
async function main() {
  const transport = new StdioServerTransport();
  await server.connect(transport);
  console.error("Weather MCP Server running on stdio");
}

main().catch((error) => {
  console.error("main()에서 치명적인 오류:", error);
  process.exit(1);
});
서버를 빌드하려면 npm run build를 실행하는 것을 잊지 마세요! 이것은 서버 연결을 위한 매우 중요한 단계입니다.
이제 기존 MCP 호스트인 Claude for Desktop에서 서버를 테스트해 보겠습니다.
Claude for Desktop으로 서버 테스트
먼저, Claude for Desktop이 설치되어 있는지 확인하세요. 여기서 최신 버전을 설치할 수 있습니다. Claude for Desktop이 이미 있는 경우, 최신 버전으로 업데이트되었는지 확인하세요.
사용하려는 MCP 서버에 대해 Claude for Desktop을 구성해야 합니다. 이렇게 하려면 텍스트 편집기에서 ~/Library/Application Support/Claude/claude_desktop_config.json에 있는 Claude for Desktop 앱 구성을 여세요. 파일이 없는 경우 생성해야 합니다.
예를 들어, VS Code가 설치된 경우:
Claude for Desktop 구성
code ~/Library/Application\ Support/Claude/claude_desktop_config.jsoncode $env:AppData\Claude\claude_desktop_config.json그런 다음 mcpServers 키에 서버를 추가합니다. MCP UI 요소는 최소한 하나의 서버가 올바르게 구성된 경우에만 Claude for Desktop에 표시됩니다.
이 경우, 다음과 같이 단일 날씨 서버를 추가합니다:
Claude for Desktop 구성
{
    "mcpServers": {
        "weather": {
            "command": "node",
            "args": [
                "/ABSOLUTE/PATH/TO/PARENT/FOLDER/weather/build/index.js"
            ]
        }
    }
}
{
"mcpServers": {
"weather": {
"command": "node",
"args": [
"C:\\PATH\\TO\\PARENT\\FOLDER\\weather\\build\\index.js"
]
}
}
}이것은 Claude for Desktop에 다음을 알려줍니다:
- “weather"라는 MCP 서버가 있다
node /ABSOLUTE/PATH/TO/PARENT/FOLDER/weather/build/index.js를 실행하여 시작한다
파일을 저장하고 Claude for Desktop을 다시 시작하세요.
날씨 서버 구축을 시작해 봅시다! 여기서 구축할 내용의 전체 코드를 찾을 수 있습니다.
더 많은 정보는 MCP Server Boot Starter 참조 문서를 참조하세요. 수동 MCP 서버 구현은 MCP Server Java SDK 문서를 참조하세요.
시스템 요구사항
- Java 17 이상이 설치되어 있어야 합니다.
- Spring Boot 3.3.x 이상
환경 설정
Spring Initializer를 사용하여 프로젝트를 부트스트랩하세요.
다음 의존성을 추가해야 합니다:
의존성
<dependencies>
      <dependency>
          <groupId>org.springframework.ai</groupId>
          <artifactId>spring-ai-mcp-server-spring-boot-starter</artifactId>
      </dependency>

      <dependency>
          <groupId>org.springframework</groupId>
          <artifactId>spring-web</artifactId>
      </dependency>
</dependencies>
dependencies {
implementation platform("org.springframework.ai:spring-ai-mcp-server-spring-boot-starter")
implementation platform("org.springframework:spring-web")
}그런 다음 애플리케이션 속성을 설정하여 애플리케이션을 구성하세요:
애플리케이션 구성
spring.main.bannerMode=off
logging.pattern.console=logging:
pattern:
console:
spring:
main:
banner-mode: off서버 구성 속성은 사용 가능한 모든 속성을 문서화합니다.
이제 서버 구축을 시작해 보겠습니다.
서버 구축
날씨 서비스
REST 클라이언트를 사용하여 National Weather Service API에서 데이터를 조회하는 WeatherService.java를 구현해 보겠습니다:
@Service
public class WeatherService {

	private final RestClient restClient;

	public WeatherService() {
		this.restClient = RestClient.builder()
			.baseUrl("https://api.weather.gov")
			.defaultHeader("Accept", "application/geo+json")
			.defaultHeader("User-Agent", "WeatherApiClient/1.0 ([email protected])")
			.build();
	}

  @Tool(description = "특정 위도/경도의 날씨 예보를 가져옵니다")
  public String getWeatherForecastByLocation(
      double latitude,   // 위도 좌표
      double longitude   // 경도 좌표
  ) {
      // 다음을 포함하는 상세 예보 반환:
      // - 온도 및 단위
      // - 풍속 및 풍향
      // - 상세 예보 설명
  }

  @Tool(description = "미국 주의 날씨 경보를 가져옵니다")
  public String getAlerts(
      @ToolParam(description = "두 글자 미국 주 코드(예: CA, NY") String state)
  ) {
      // 다음을 포함하는 활성 경보 반환:
      // - 이벤트 유형
      // - 영향받는 지역
      // - 심각도
      // - 설명
      // - 안전 지침
  }

  // ......
}
@Service 어노테이션은 애플리케이션 컨텍스트에서 서비스를 자동으로 등록합니다.
Spring AI @Tool 어노테이션은 MCP 도구를 쉽게 생성하고 유지할 수 있게 해줍니다.
자동 구성은 이러한 도구를 MCP 서버에 자동으로 등록합니다.
부트 애플리케이션 생성
@SpringBootApplication
public class McpServerApplication {

	public static void main(String[] args) {
		SpringApplication.run(McpServerApplication.class, args);
	}

	@Bean
	public ToolCallbackProvider weatherTools(WeatherService weatherService) {
		return  MethodToolCallbackProvider.builder().toolObjects(weatherService).build();
	}
}
MethodToolCallbackProvider 유틸리티를 사용하여 @Tools를 MCP 서버에서 사용되는 실행 가능한 콜백으로 변환합니다.
서버 실행
마지막으로, 서버를 빌드해 보겠습니다:
./mvnw clean install이것은 target 폴더 내에 mcp-weather-stdio-server-0.0.1-SNAPSHOT.jar 파일을 생성합니다.
이제 기존 MCP 호스트인 Claude for Desktop에서 서버를 테스트해 보겠습니다.
Claude for Desktop으로 서버 테스트
먼저, Claude for Desktop이 설치되어 있는지 확인하세요. 여기서 최신 버전을 설치할 수 있습니다. Claude for Desktop이 이미 있는 경우, 최신 버전으로 업데이트되었는지 확인하세요.
사용하려는 MCP 서버에 대해 Claude for Desktop을 구성해야 합니다.
이렇게 하려면 텍스트 편집기에서 ~/Library/Application Support/Claude/claude_desktop_config.json에 있는 Claude for Desktop 앱 구성을 여세요.
파일이 없는 경우 생성해야 합니다.
예를 들어, VS Code가 설치된 경우:
구성 파일 열기
code ~/Library/Application\ Support/Claude/claude_desktop_config.jsoncode $env:AppData\Claude\claude_desktop_config.json그런 다음 mcpServers 키에 서버를 추가합니다.
MCP UI 요소는 최소한 하나의 서버가 올바르게 구성된 경우에만 Claude for Desktop에 표시됩니다.
이 경우, 다음과 같이 단일 날씨 서버를 추가합니다:
단일 날씨 서버 추가
{
  "mcpServers": {
    "spring-ai-mcp-weather": {
      "command": "java",
      "args": [
        "-Dspring.ai.mcp.server.stdio=true",
        "-jar",
        "/ABSOLUTE/PATH/TO/PARENT/FOLDER/mcp-weather-stdio-server-0.0.1-SNAPSHOT.jar"
      ]
    }
  }
}
{
"mcpServers": {
"spring-ai-mcp-weather": {
"command": "java",
"args": [
"-Dspring.ai.mcp.server.transport=STDIO",
"-jar",
"C:\\ABSOLUTE\\PATH\\TO\\PARENT\\FOLDER\\weather\\mcp-weather-stdio-server-0.0.1-SNAPSHOT.jar"
]
}
}
}이것은 Claude for Desktop에 다음을 알려줍니다:
- “my-weather-server"라는 MCP 서버가 있다
java -jar /ABSOLUTE/PATH/TO/PARENT/FOLDER/mcp-weather-stdio-server-0.0.1-SNAPSHOT.jar를 실행하여 시작한다
파일을 저장하고 Claude for Desktop을 다시 시작하세요.
Java 클라이언트로 서버 테스트
수동으로 MCP 클라이언트 생성
McpClient를 사용하여 서버에 연결하세요:
var stdioParams = ServerParameters.builder("java")
  .args("-jar", "/ABSOLUTE/PATH/TO/PARENT/FOLDER/mcp-weather-stdio-server-0.0.1-SNAPSHOT.jar")
  .build();

var stdioTransport = new StdioClientTransport(stdioParams);

var mcpClient = McpClient.sync(stdioTransport).build();

mcpClient.initialize();

ListToolsResult toolsList = mcpClient.listTools();

CallToolResult weather = mcpClient.callTool(
  new CallToolRequest("getWeatherForecastByLocation",
      Map.of("latitude", "47.6062", "longitude", "-122.3321")));

CallToolResult alert = mcpClient.callTool(
  new CallToolRequest("getAlerts", Map.of("state", "NY")));

mcpClient.closeGracefully();
MCP 클라이언트 부트 스타터 사용
spring-ai-mcp-client-spring-boot-starter 의존성을 사용하여 새 부트 스타터 애플리케이션을 생성하세요:
<dependency>
    <groupId>org.springframework.ai</groupId>
    <artifactId>spring-ai-mcp-client-spring-boot-starter</artifactId>
</dependency>
그리고 spring.ai.mcp.client.stdio.servers-configuration 속성을 claude_desktop_config.json을 가리키도록 설정하세요.
기존 Anthropic Desktop 구성을 재사용할 수 있습니다:
spring.ai.mcp.client.stdio.servers-configuration=file:PATH/TO/claude_desktop_config.json클라이언트 애플리케이션을 시작하면 자동 구성이 claude_desktop_config.json에서 자동으로 MCP 클라이언트를 생성합니다.
더 많은 정보는 MCP Client Boot Starters 참조 문서를 참조하세요.
더 많은 Java MCP 서버 예제
starter-webflux-server는 SSE 전송을 사용하여 MCP 서버를 생성하는 방법을 보여줍니다. Spring Boot의 자동 구성 기능을 사용하여 MCP 도구, 리소스 및 프롬프트를 정의하고 등록하는 방법을 보여줍니다.
명령어로 테스트
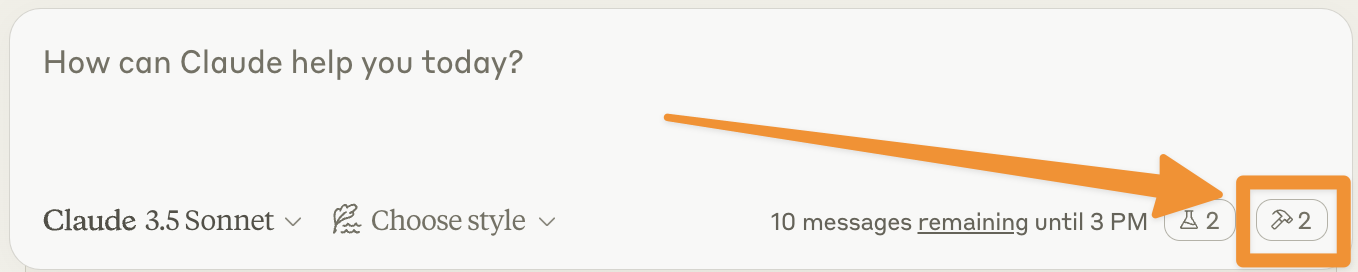
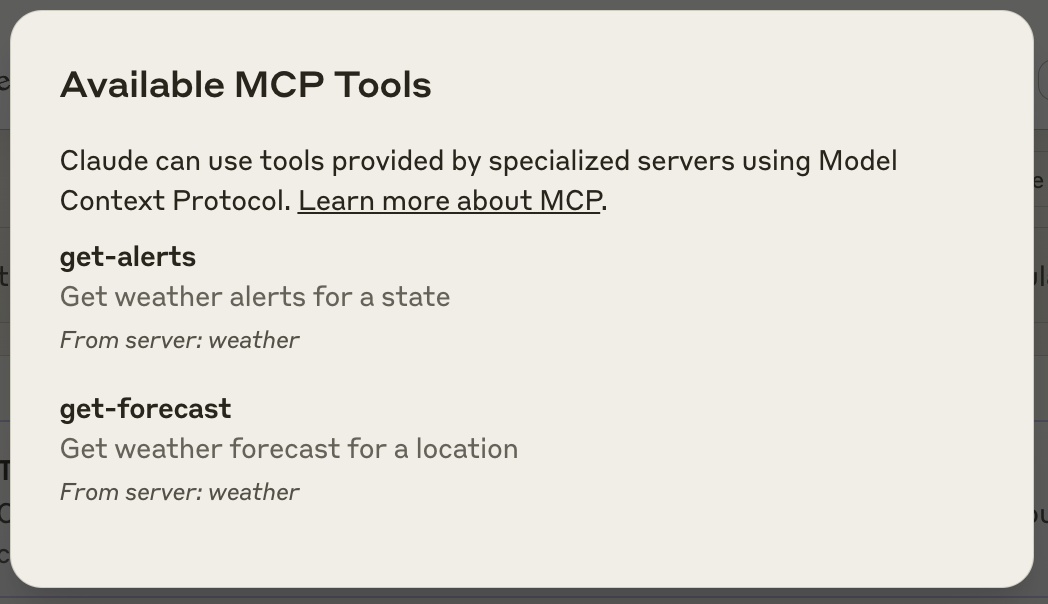
Claude for Desktop이 weather 서버에서 노출한 두 개의 도구를 인식하는지 확인해 보겠습니다. 망치![]()
망치 아이콘을 클릭하면 두 개의 도구가 나열된 것을 볼 수 있습니다:
서버가 Claude for Desktop에서 인식되지 않는 경우, 디버깅 팁을 위해 문제 해결 섹션으로 진행하세요.
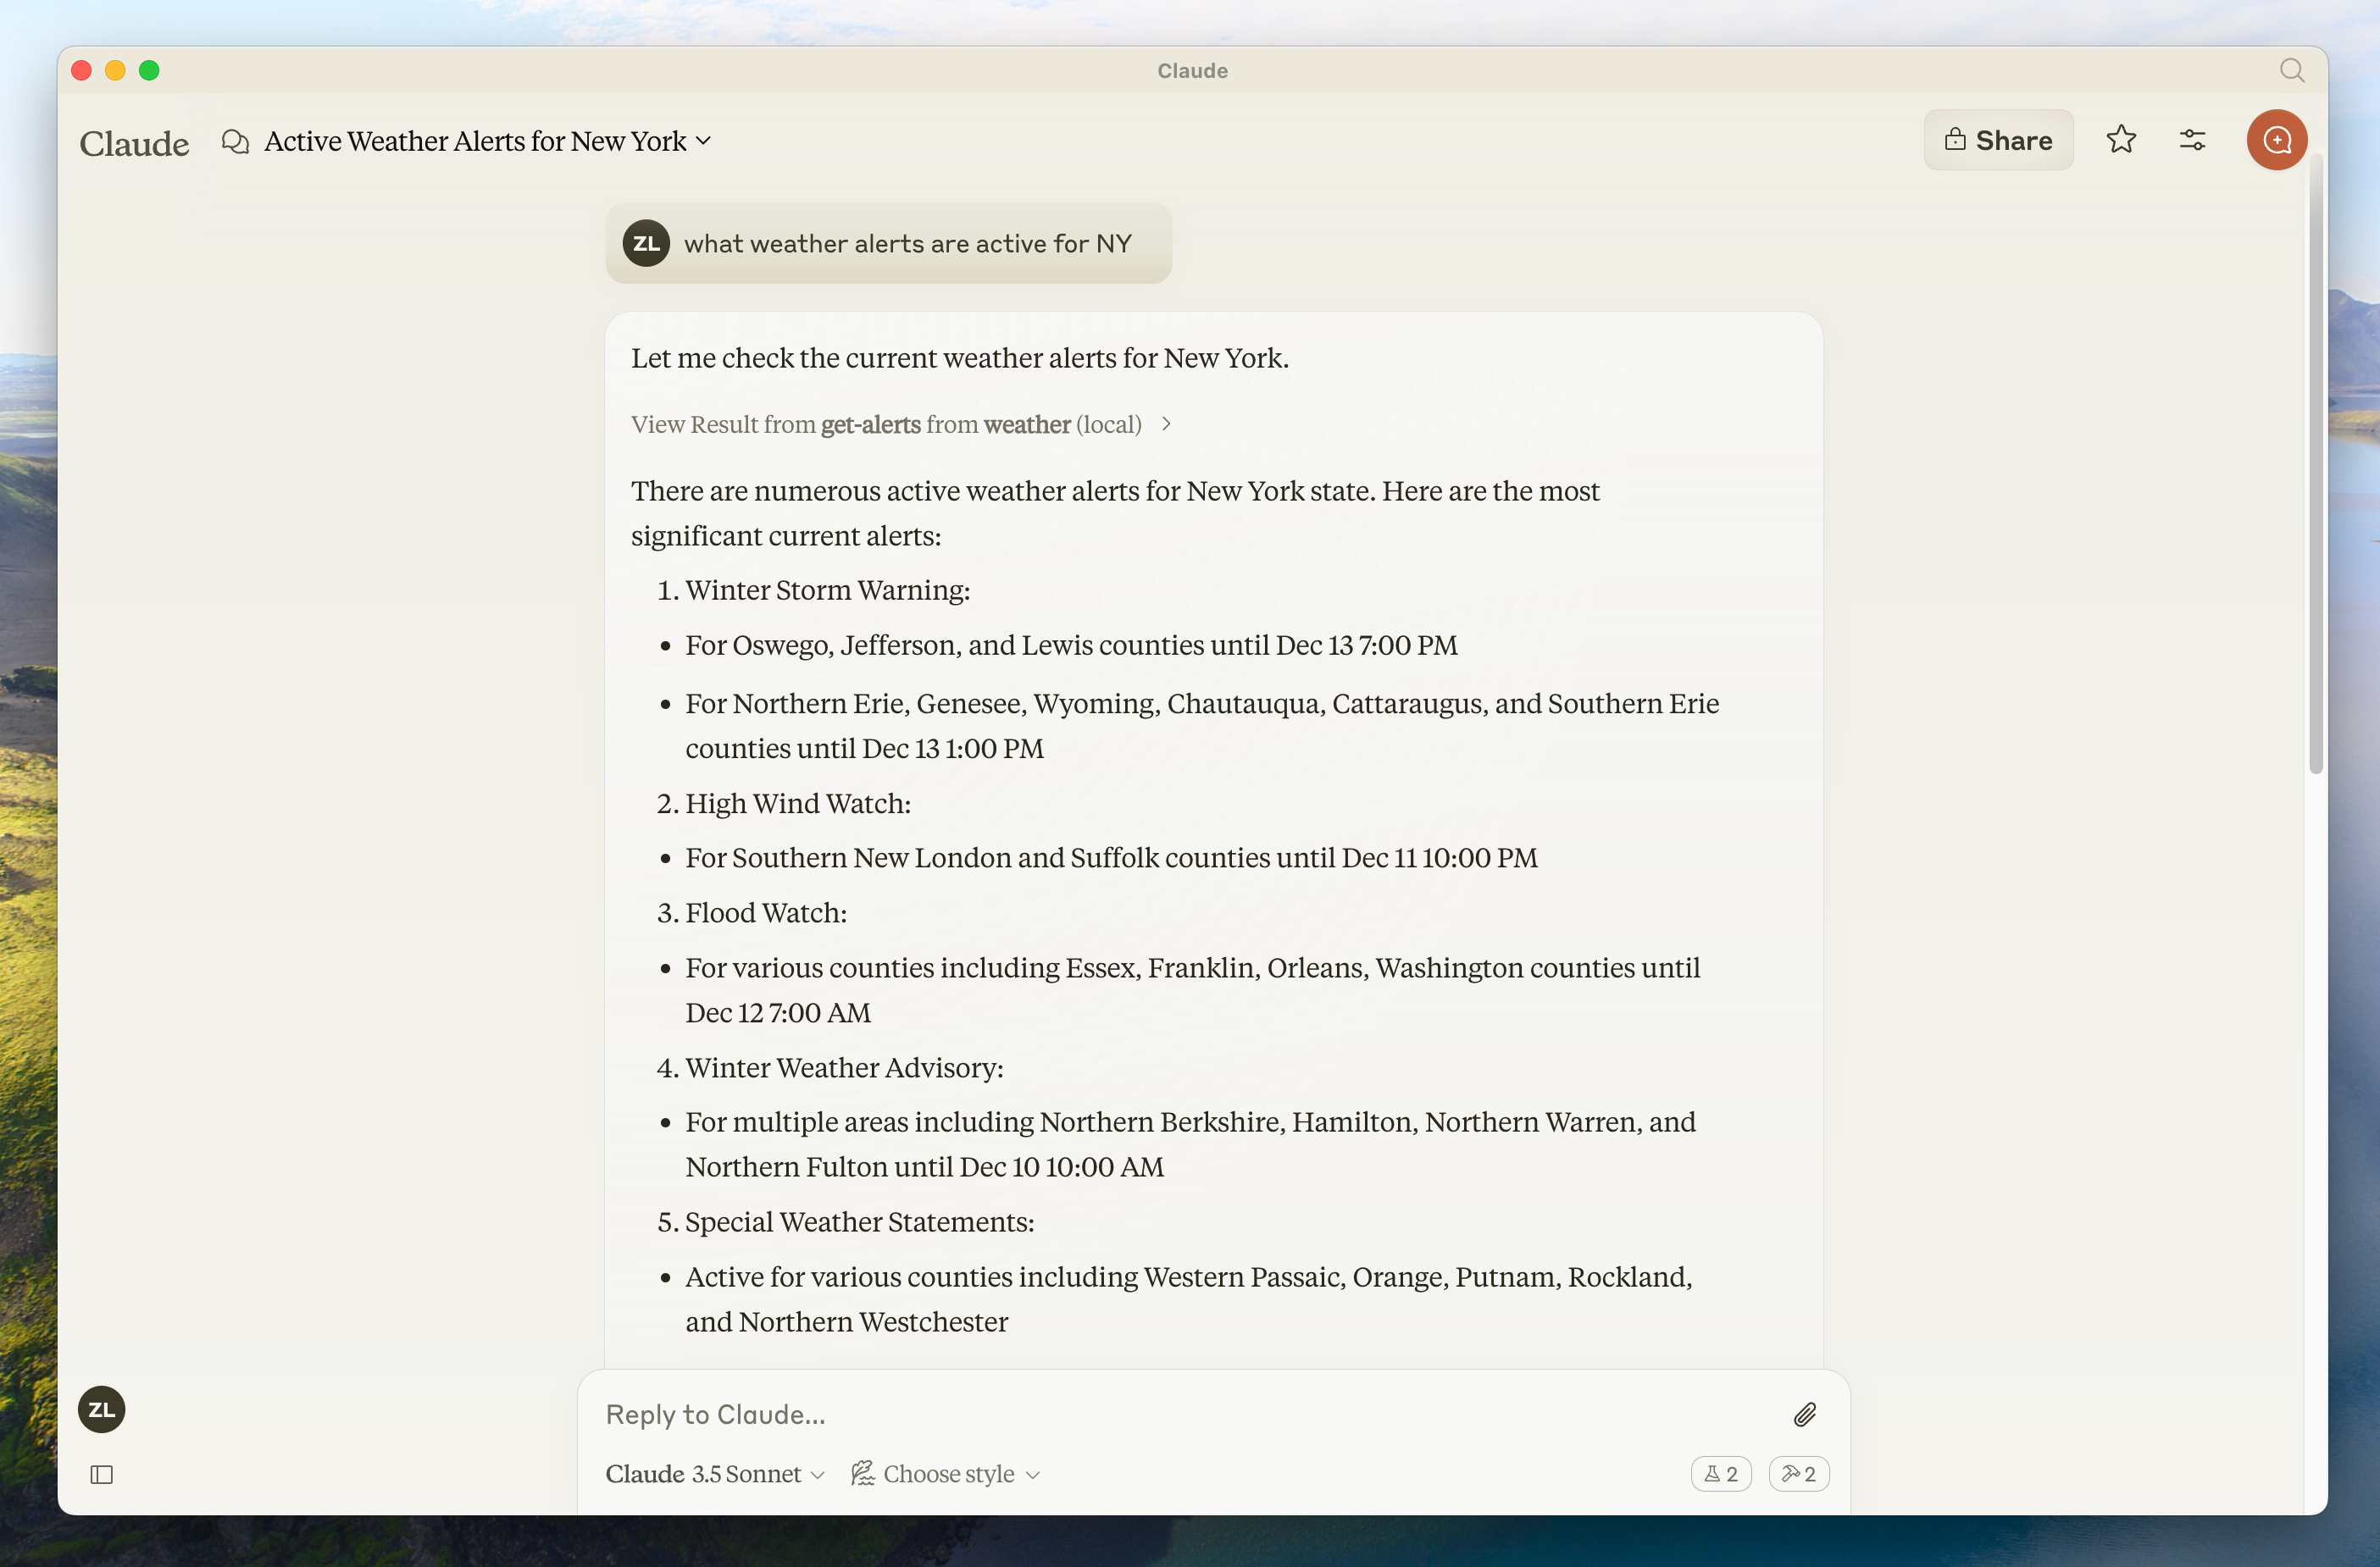
망치 아이콘이 표시되면 이제 Claude for Desktop에서 다음 명령어를 실행하여 서버를 테스트할 수 있습니다:
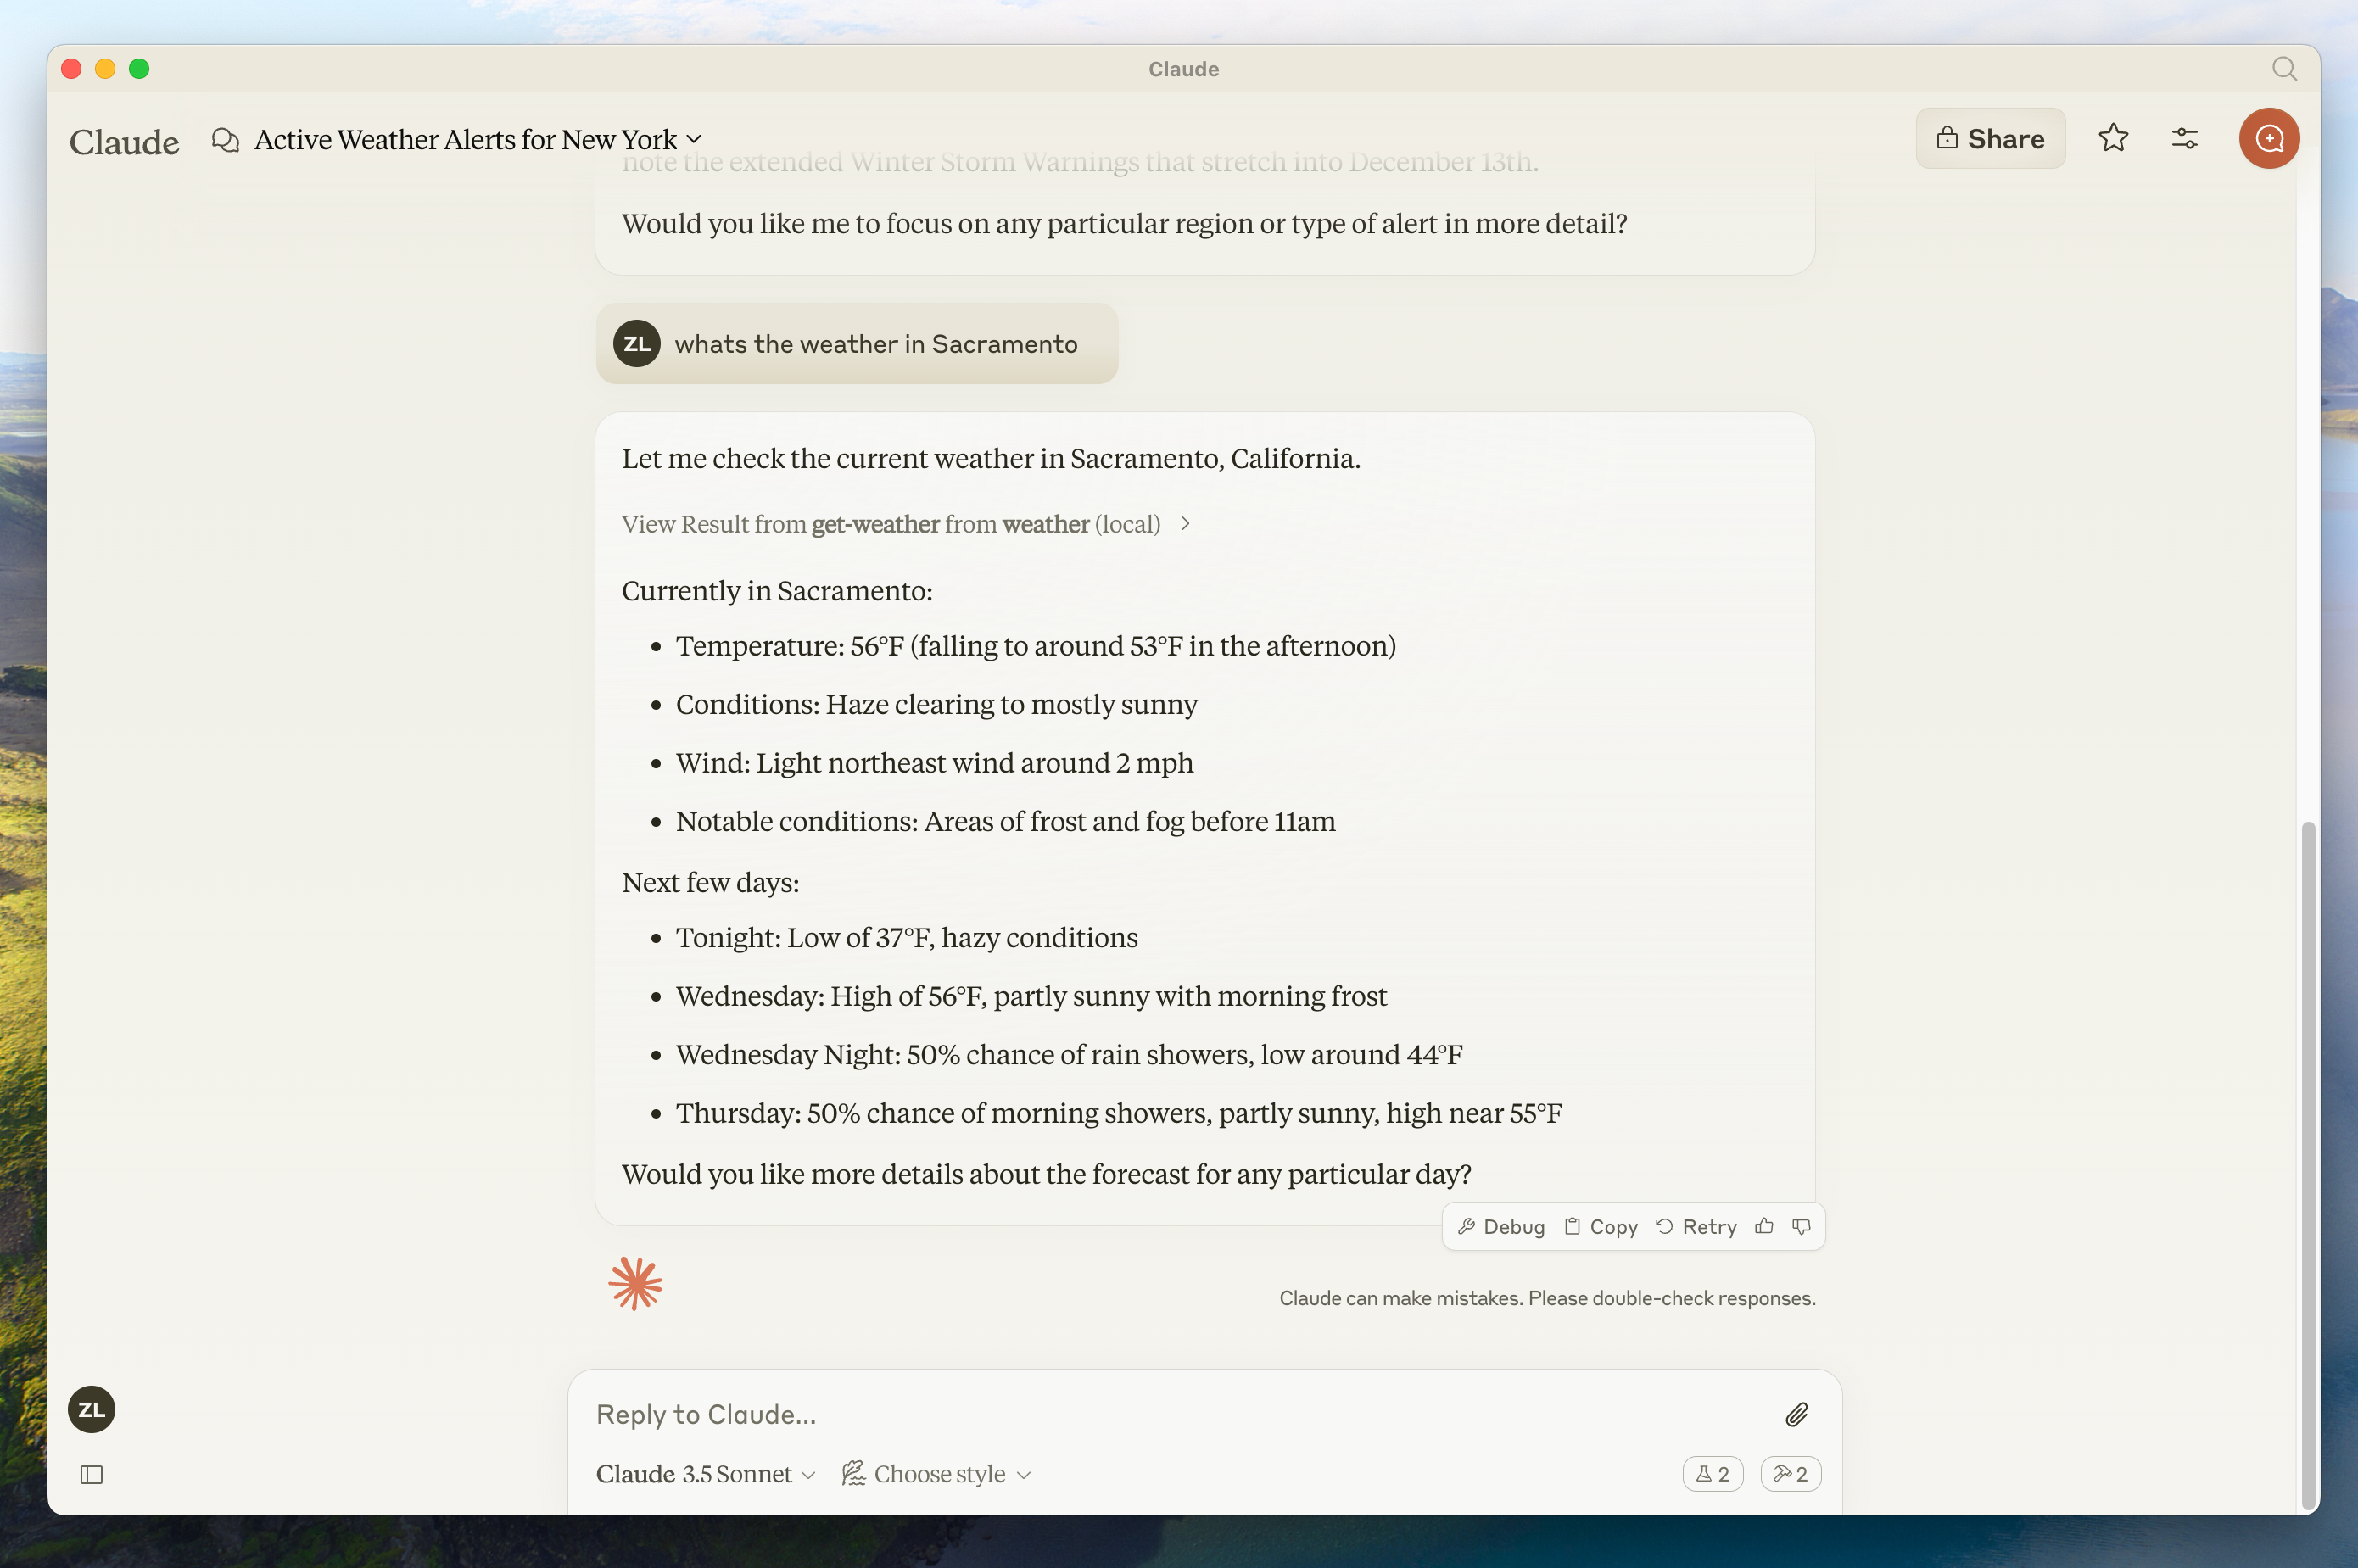
- 새크라멘토의 날씨는 어떤가요?
- 텍사스의 활성 날씨 경보는 무엇인가요?
내부적으로 일어나는 일
질문을 할 때:
- 클라이언트가 질문을 Claude에게 전송합니다
- Claude가 사용 가능한 도구를 분석하고 사용할 도구를 결정합니다
- 클라이언트가 MCP 서버를 통해 선택된 도구를 실행합니다
- 결과가 Claude로 다시 전송됩니다
- Claude가 자연어 응답을 구성합니다
- 응답이 사용자에게 표시됩니다!
문제 해결
Claude for Desktop 통합 문제
Claude for Desktop에서 로그 가져오기
MCP와 관련된 Claude.app 로깅은 ~/Library/Logs/Claude의 로그 파일에 기록됩니다:
mcp.log는 MCP 연결 및 연결 실패에 대한 일반 로깅을 포함합니다.mcp-server-SERVERNAME.log라는 파일은 명명된 서버의 오류(stderr) 로깅을 포함합니다.
다음 명령어를 실행하여 최근 로그를 나열하고 새 로그를 따라갈 수 있습니다:
# Claude의 오류 로그 확인
tail -n 20 -f ~/Library/Logs/Claude/mcp*.log
서버가 Claude에 표시되지 않음
claude_desktop_config.json파일 구문을 확인하세요- 프로젝트 경로가 상대 경로가 아닌 절대 경로인지 확인하세요
- Claude for Desktop을 완전히 다시 시작하세요
도구 호출이 조용히 실패함
Claude가 도구를 사용하려고 시도하지만 실패하는 경우:
- Claude의 로그에서 오류를 확인하세요
- 서버가 오류 없이 빌드되고 실행되는지 확인하세요
- Claude for Desktop을 다시 시작해 보세요
아무것도 작동하지 않습니다. 어떻게 해야 하나요?
더 나은 디버깅 도구와 더 상세한 지침을 위해 디버깅 가이드를 참조하세요.
날씨 API 문제
오류: 그리드 포인트 데이터 검색 실패
이것은 일반적으로 다음 중 하나를 의미합니다:
- 좌표가 미국 외부에 있습니다
- NWS API에 문제가 있습니다
- 속도 제한을 받고 있습니다
수정:
- 미국 좌표를 사용하고 있는지 확인하세요
- 요청 사이에 작은 지연을 추가하세요
- NWS API 상태 페이지를 확인하세요
오류: [STATE]에 대한 활성 경보 없음
이것은 오류가 아닙니다 - 해당 주에 현재 날씨 경보가 없다는 것을 의미합니다. 다른 주를 시도하거나 심한 날씨 동안 확인해 보세요.